The 4CM or ‘Four Cable Method’ describes a way to connect your guitar and create effects chains.
This is a rather simple configuration that doesn’t require any new technology. It allows you to set up your effects chain with greater control over the sound.
As the name suggests, you will need 4 jack cables to set up an effects chain! The 4-cable method involves cabling an amplifier to a pedalboard, whether a series of pedals or an effects processor like the Ampero II.
The goal is to create a specific sound routing between these two elements. This allows you to create new sounds by placing specific effects upstream or downstream.
Why use the 4-cable method?
The 4-cable method allows you to place the effect before or after the amplifier. This allows you to get the best out of your amplifier. The reason is that an amplifier can color the sound of an instrument through its preamp, EQ and other configuration parameters.
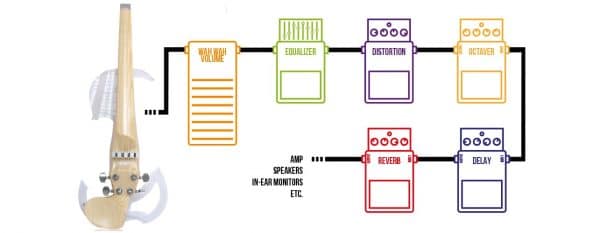
Effects sound different depending on their position in a chain. For example, a reverb positioned at the beginning or at the end of a chain changes the sound differently. Likewise, a distortion sounds different if you place it at the beginning or at the end of an effect chain.
The 4-cable method relies on each effect behaving differently depending on its position in the effects chain.
The 4CM method for guitars
The 4 cable method is often used in electric guitars to reduce the natural distortion generated by the amplifier. The higher the gain on the amplifier, the more sound compression can be heard. This compression can compromise the quality of some effects positioned upstream of the amplifier, particularly spatialization effects such as reverb and delay. The 4CM method prevents this problem by isolating some parts of the effects chain. An effects loop system is used to bypass part of the signal.
Some guitarists also use it to get some color from the amplifier. You can use the 4CM method in your sound system for concerts or recordings if your amplifier has a very good pre-amplifier. The sound will go through the amplifier before being redirected to the mixing desk.
The 4CM method for bowed string instruments
This method can be used to reduce sound compression for bowed instruments (just like for guitars) and to get the most out of an amp.
It also allows you to control the noise produced by the friction of the bow. This noise is caused by the musician changing the direction of the bow. It is captured by the instrument’s pickup and then reproduced into the audio signal. This noise will definitely be heard on a violin, cello or viola, regardless if it is an acoustic or electric instrument.
This noise is usually removed in classical audio productions, such as jazz, blues, pop, etc. Sound engineers want to remove it because they only want to keep the sound of the instrument. If this noise isn’t removed in an effects chain, it will be boosted by all the effects used and by the amp.
Please note that it is not always necessary to remove this noise. It depends on the musician’s personal sound preferences. In fact, some violinists like to keep it to create a specific raw sound. Some musicians who like high gain sounds, excessive saturation, and the ‘grunge’ feel of this noise, also like to keep it in the chain to get a specific effect.
There are many ways to reduce this noise. The 4CM method is just one of them.
How to use the 4CM method to reduce the noise created by the friction of the bow?
You can reduce the noise by isolating the beginning of your chain with the 4CM method. You can then reduce low frequencies from your amplifier’s EQ by targeting the frequency range where this noise is found and then proceed with your effects chain.
This noise is targeted below 150 Hz for a 4 string violin. This reference value should be adapted for 5, 6 and 7 strings which have lower pitched strings. If you don’t adapt this value, you risk removing some low frequencies produced by the extra strings.
How to use the 4-cable method?
To use the 4-cable method, you will need:
- A musical instrument
- 4 jack cables
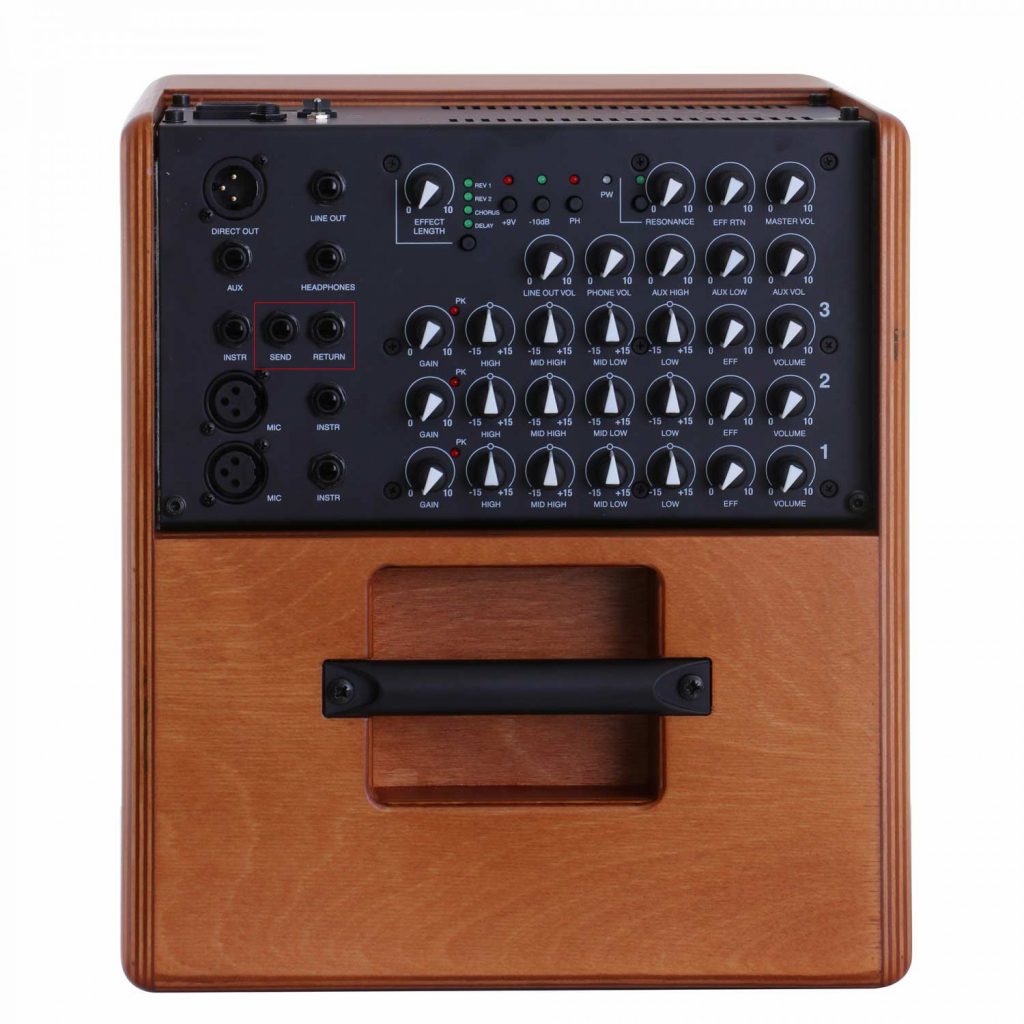
- An amplifier with an effects loop system (also called ‘Send & Return’). Below is the Acus Oneforstrings 8 amp with this system.
- A pedalboard or a multi-effects processor with an effects loop system. The Ampero II features this system. This processor has ‘Send & Return’ jacks on top of the usual jacks.
The Send & Return system
This system has different names depending on the brand: fx out, fx in, fx send, Out, effect out, effect send, fx return, effect in, effect return, etc. But the most common one is: Send and Return or Send & Return.
This system uses two specific jacks on an amp or effects processor. The first one is used to send the signal out of the device, while the second one is used to send it into the device. Below are the two jacks used for the 4-cable method on the Ampero II Stomp.

We offer multi-effects processors configured for violins, violas and cellos. By example, the Ampero II Stomp available on our website contain a presets series adapted to the frequencies of these musical instruments in order to insure an accurate and qualitative sound. We also offer some presets collections for this effects processor. In this video, the classic presets are presented by the violinist Eduardo Bortolotti.
Configuration examples with the Ampero 2 effects processor
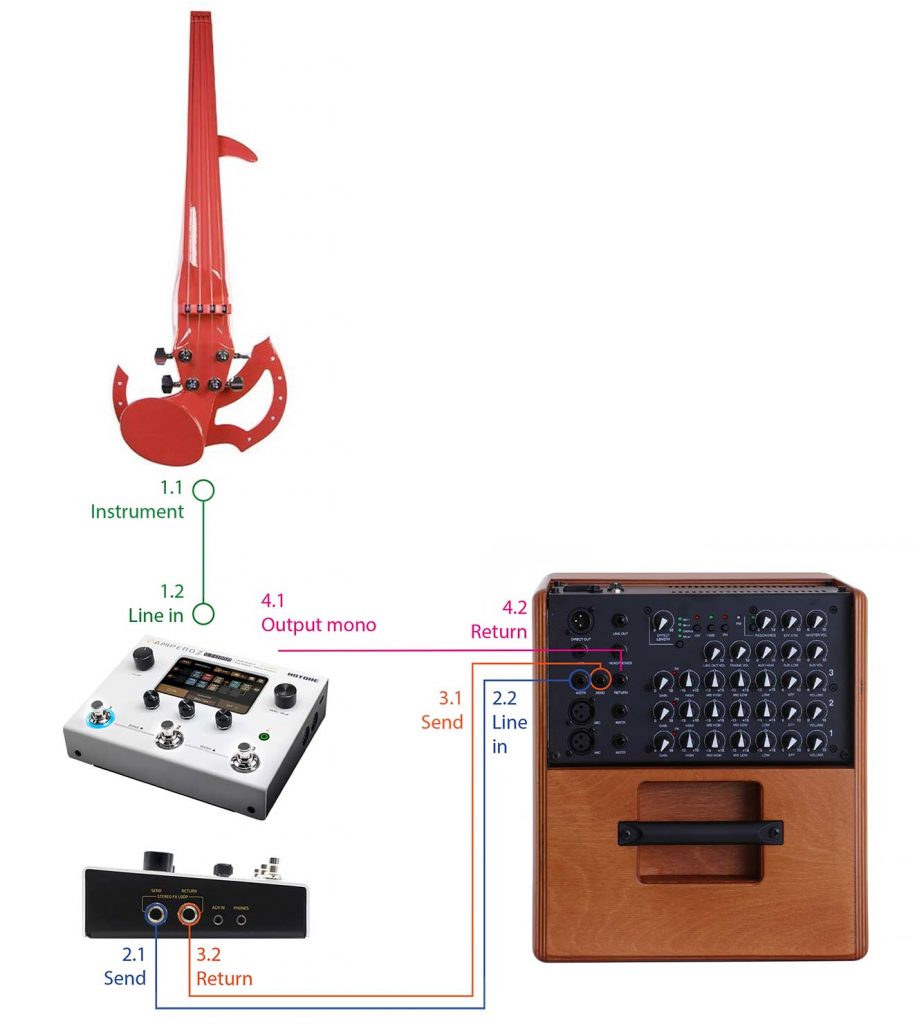
- Connect the first cable from your instrument (1.1) to the IN of the Effects Processor (1.2).
- Connect the second cable from the Send OUT of the Effects Processor (2.1) to the Instrument IN of the amplifier (2.2). This allows you to use your amplifier’s pre-amp to customize your sound.
- Connect the third cable from the Send OUT of the amplifier (3.1) to the Return IN of the effects processor (3.2).
- Connect the fourth cable from the Effects Processor’s Standard OUT (4.1) to the Return IN of the amplifier (4.2).
This system allows you to control the location of each effect in your presets. Are they placed before or after the amplifier? It’s very easy to test and imagine new effect chains.
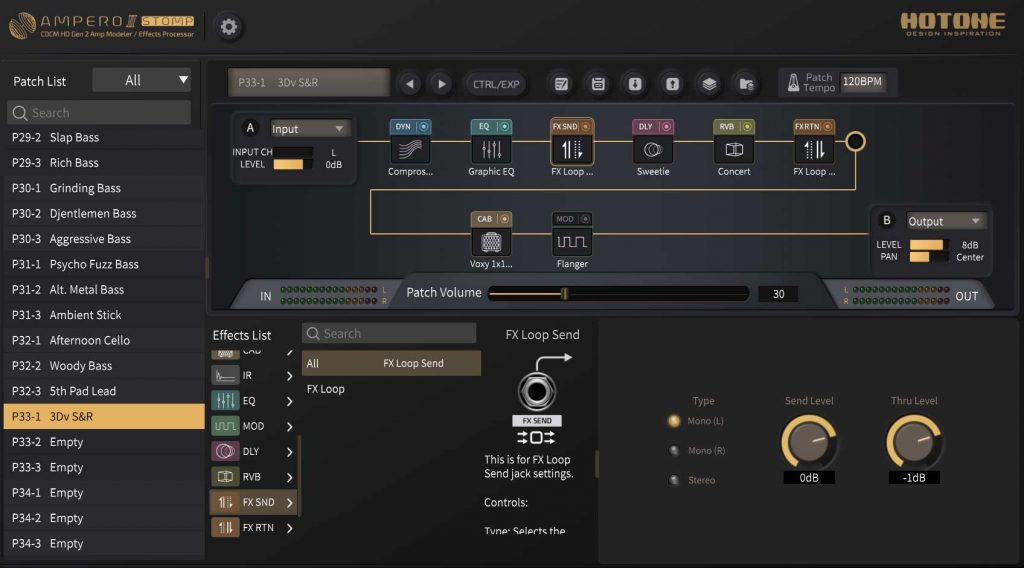
Depending on the processor, you’ll have to enable the 4-cable system in the device’s menu and then add it to your effects chains. The Ampero 2 has 3 different modules that can be used in effects chains:
- FX SND: this module sends a signal to external devices through the Send jack of the Ampero 2.
- FX RTN: This module receives a signal from one or more external devices through the Return jack of the Ampero 2.
- FX LOOP: This module allows you to add effects from external effects pedals. It uses both the send and return jacks.
Images and sources : Hotone Audio, Acus, 3Dvarius


